EigenD - custom midi output

The instructions for installing EigenD are great, but I ran into an issue where the closed source Eigenharp driver wouldn’t auto install. I had to click ‘see details’ to locate the install directory, then went into \Program Files (x86)\Eigenlabs\driver-1.0.10 and had to run ‘dpinst.exe’ as administrator before the driver would correctly install. I didn’t see any mention of this step, so it might be a new thing that Windows 11 is forcing people to do.

I’m now at a stage where I’m completely stuck. I need a completely new workbench preset written, where each of the rows transmits chromatically on its own unique midi channel, and where the scaling is reversed from the standard. I’ve tried to explain what I need in this short video - https://www.youtube.com/watch?v=0ilVb0NtFsA

I don’t need any menu options on the Tau itself, as I can transpose within Ableton Live itself. I just need the Tau to act as a simple midi controller. Is there anyone who can help me with this? Trying to understand Workbench just destroys my brain.

Thanks in advance x

ok, Ive moved this topic away from EigenD 3.0 Beta, as Im assuming you are trying to install 2…1.7 as the 3.0 beta does not at this time support windows.

so I assume you are following along with this topic

note: Ive updated the above topic, to point at 2.1.7 release, rather than ‘latest’, as this is more appropriate, outside of EigenD 3.0 Beta

so you should pickup EigenD 2.1.7 from

yeah, Id assume thats always the case… or at least that windows would prompt you to install as admin. generally windows has tightened up the ‘user = admin’ over the years :wink:

ok, so the first question is … are the factory setups working?
there is no point, in proceeding with modification via workbench, unless we are certain everything is working correctly before hand.
i.e. are we just talking about how to use workbench to achieve what you want or an issue?

I’m now at a stage where I’m completely stuck. I need a completely new workbench preset written, where each of the rows transmits chromatically on its own unique midi channel, and where the scaling is reversed from the standard. I’ve tried to explain what I need in this short video - https://www.youtube.com/watch?v=0ilVb0NtFsA

Ive not watch the video (yet) …
but when you say ROW, to you mean down the Tau? or across?
(as Id call that column … then again, I cannot remember which way EigenD calls it :laughing: )

basically, if you want to have separate midi channels. then its going to get fun…

Id start by looking at the basic midi factory example, to get yourself familiar with the modules you are going to need.

essentially what you are going to need to do is, create a keygroup for every ‘row’ (i.e. what you want as a midi channel), in that keygroup you list only the keys that you are interested in (i.e. that row)

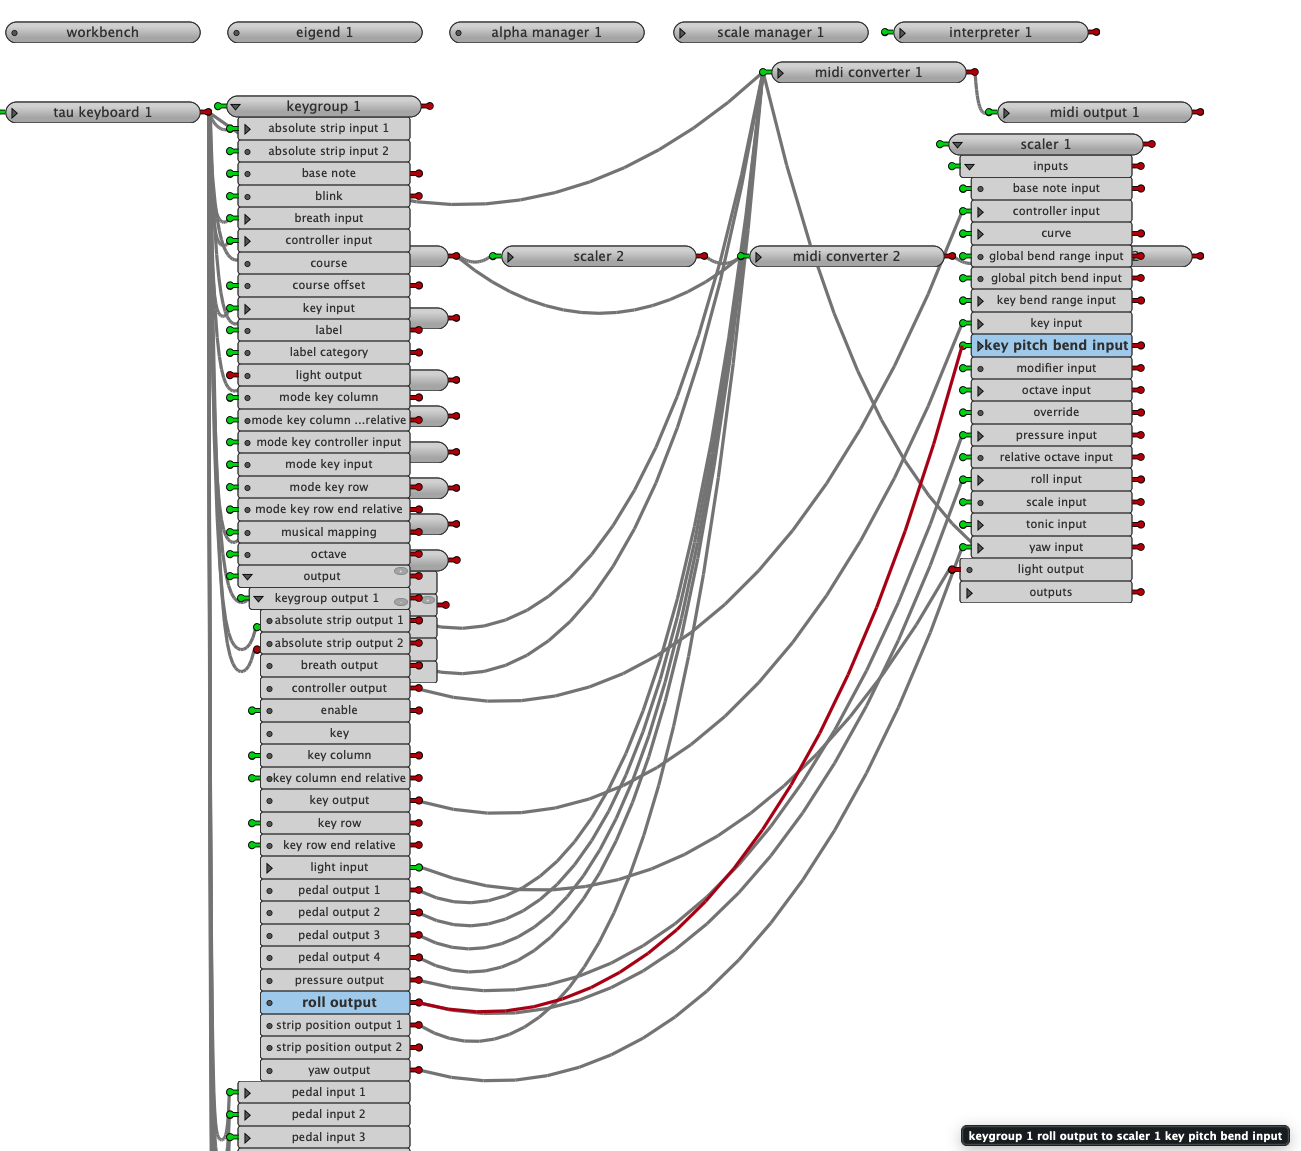
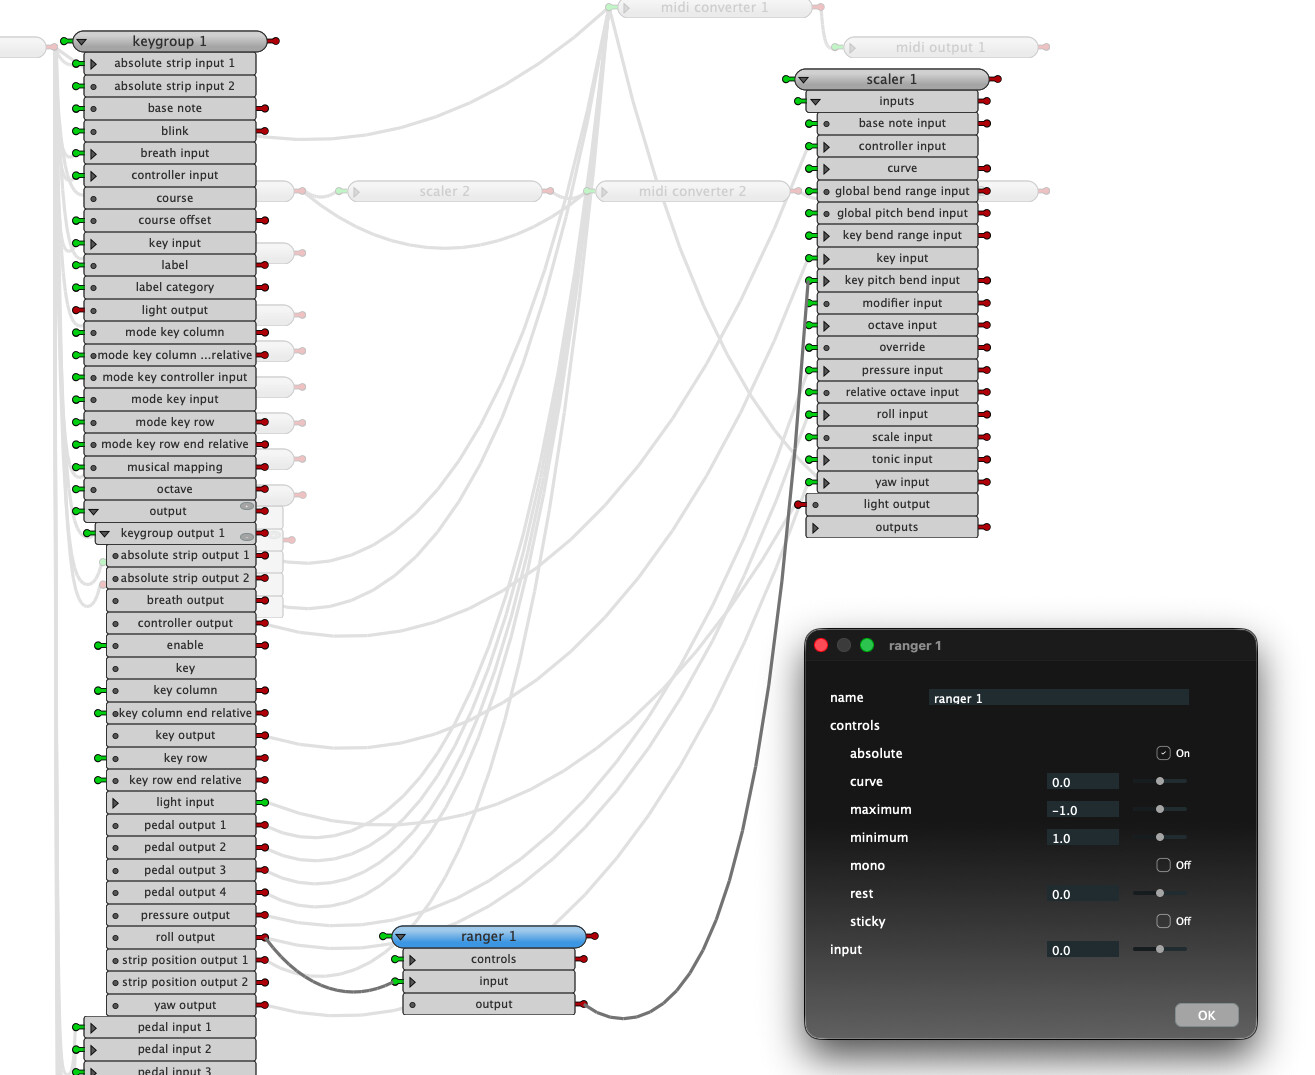
then for each of those keygroup, create keygroup output then send to a scaler, then midi converter, then finally midi output.

each scale you configure for chromatic and octave, each midi converter midi channel etc.

basically , its like the midi example, except you are going to have multiple keygroups.

so

keyboard → keygroup 1 , keygroup 2 , keygroup 3 , etc

(Id probably actually go keyboard → Keygroup Main → keygroup 1 , keygroup 2 , keygroup 3 , but I suspect that is not ‘necessary’)

keygroup N → output 1 → Scaler N → Midi Converter N → midi output N

i guess, the other way, if you are not confident with this, and the you are already doing mapping in Ableton, would to be just use the basic midi example.
that could be seutp to send different midi notes for every key (as tau has less < 127 :)) , then map from that.
thats pretty trivial to do, just change it so the offset is number of keys in a column

1 Like

Thanks for your reply Mark, and thanks for moving this to a new thread. I couldn’t see any recent threads for v2 and I wasn’t sure if my request deserved a new thread.

Re: rows, yes, it’s the long rows across as opposed to columns, and because I’ve positioned the Tau so that the main playing keys are under the right hand, the scaling needs to be reversed from the default.

EigenD works fine, and I can play sounds through EigenD using the Tau, and I also remember how to get midi into a DAW by routing everything out of EigenD and into a virtual midi interface like LoopBE. It’s just the preset that I’m having difficulty doing.

If a seperate midi channel per row is difficult, is it easier or even possible to set up the main keyboard on MPE lower and the 12 large pads on MPE upper, so that I can use one for instrument and one for drums at the same time?

I’ll digest your reply a few times and dive back into Workbench. Thanks!

yes, thats possible even in the tau factory preset.

the tau factory preset has 2 midi rigs.
so to get what you need , just use the standard ‘1 split layout’.
then set the main keygroup to use midi rig 1
and the percussion keygroup to use midi rig 2.

this is described in the tau quick start manual.

midi rig 1 uses midi converter 1 (and output 1),
so set converter to use MPE lower ( I call it MPEa)

midi rig 2 uses midi converter 2 (and output 2),
set converter to use MPE upper( I call it MPEb)

then you can set the min / max midi channel on each to ensure you don’t overlap.

that said, if you are using LoopBE, then Id just use MPEa for both, and send to different virtual midi devices (MPEb / Upper is not well supported, so I avoid !)

IF you’d prefer something that loads quicker, you should be able to Experimental Tau Midi Basic, that doesn’t have any ‘extras’ , just midi rig 1 on main keys, midi rig 2 on percussion keys…

midi basic, is quicker to load and would be easier to edit, if you wanted something slightly different.
the factory setup is more comprehensive, and has documentation :wink:

1 Like

Thanks so much! You’ve given me so many pointers that I think I can manage this once the brain fog clears! I wasn’t even aware of the experimental patches for the Tau.

[Edit] I think I might be in a losing fight. Eigenbrowser crashes after initialisation each time, and I’m pretty certain I need that to select the midi ports.

1 Like

I haven’t been using EigenD for quite a while now, so it is time for me to refresh my memory anyways. So if you like I can:

  1. Create the setup you describe in the video (basically doing what thetechnobear says, using separate keygroups for each of the midi channels).
  2. …or, if you want help learning how to do it yourself instead, I can type up a step-by-step guide on what you need to do. Whatever you prefer.

By the way, you can set the midi ports from Workbench.

1 Like

Ive not used EigenBrowser in a very long time, its been broken on macOS for a very long time (5+ years? due to out of date python libs) and it will be (at least initially) deprecated in 3.0.
I’d always recommend using workbench instead.

however, It “should” work on windows, as its not changed.
is this on the factory setup or the experimental one? factory should work (on windows), not sure about experimental (again not tested)

1 Like

Kai, if you are able to create the setup for me, that would be incredible! I’m pretty disabled with CFS/ME, and learning new tech is a huge struggle. I spent a lot of yesterday evening trying to understand how everything in Workbench functioned, and the more I clicked, the more confused I got. I’m sure that everything will start making sense over time, but I fear the length of that time will be a long one.

And to make things less complicated, let’s keep it to two single MPE zones - main keyboard and the large drum pads, rather than individual midi channels per row.

It’s really good news that I can select the midi interface in workbench. I woke up this morning with the depressing thought that I might have to sell the Tau after all this time.

Re: Eigenbrowser not working, it crashed on both the factory setup and the experimental one. As soon as the splash screen goes, the app vanishes without any error message. But if I can do everything I need in Workbench, it’s not an issue for me.

Also, I’m still quite a while away from having the health to dive back into the improvisation headspace, so there’s no rush for any of this. I’m just trying to get everything set up and ready for when I have my next window of good health.

Thank you both!

1 Like

here you go…
TauMidiSetups.zip (78.6 KB)

Basically drop these into your Setups directory (Tools → open library directory), just the 2 files (not the directory in the zip)
(there are 2 slightly different setups, see below)

These are a modification of the 'Experimental Setups → tau - > 3 (midi basic),
mainly just configured to MPE. (which you can do within EigenD no workbench necessasry)

the only thing, you will need to do is to launch EigenD load setup then start Workbench, and edit the Midi Output modules.
this you have to do, as your outputs are different from others.

then SAVE the setup , so you dont have to do again :wink:

tips:

  • remember in Ableton, you’ll need to configure the Midi Input to MPE !
  • if your synth has limited voices, (e.g. Haken), you can change max channel in EigenD ->Midi Converter N
  • if for some reason, you want to use upper channel MPE for percussion keys (I highly suggest you do NOT) , then again edit EigenD → Midi Converter 2, and switch to MPEb
  • more info on what they keys do, look at setup description for Experimental Setups → tau - > 3 (midi basic)

oh, and have fun.


some notes on the setup…

both setups - are MPE setup.
given you are using LoopBE, and so can have different virtual midi devices
both are using ‘normal’ MPE (lower channel), then you set the Midi Output to two different devices for main keys and percussions

both setups are chromatic (though you can switch scale/tonic on main keys, as per midi experimental)

user 4 - keeps the ‘standard’ Eigenharp layout , so 4 note offsets per column.

user 5 - just a linear note scale down the keys, and then across.

so 5, is more useful if you are going to redo mapping elsewhere.
(4 is arguably more playable)


how was this done…aka what changes were made.

so the move to MPE does not require you to use Workbench, simply just select MIDI converter 1/2 in EigenD menu.
you can see how I setup this, in particular change to MPE, then move Yaw to CC74, and pressure to channel pressure (both set to per note

CC74, then needs to use 100 50 100, to give bi-directional timbre 64 = centre

setup pitchbend range to 48 (standard MPE)

in workbench I edited scaler, to change the base octave.
this was only really required for user 5, since the default base would go beyond note 127 !

for setup 5, I change the offset to get a linear layout, check it out if you are interested or want to modify :slight_smile:

Then I tested both with Ableton and Madrona Labs Aalto (my goto MPE synth :))


disclaimer :
I did this with 3.0 beta, but they should be compatible.
(I was going to do with 2.x but that now has all sorts of bugs on macOS, and was pretty broken… goes to show 3.0 even in beta is better :))

1 Like

so, as a side note…

I kept midi experimental ‘as is’, as its got some nice functions for the buttons.
e.g. main keyboard as tonic up/down, octave up/down, select scale ( #4 = chromatic), and then 4 cc outputs on the main keys.

but you could remove all of this if you want.

so consider it a ‘starting point’ for further customisation,

e.g. if you want you can safely remove all the talkers.

if you want ALL the keys (so the bottom 4 that are orange.
you would need to edit
a) remove the controller pressure / yaw N wires on midi converter 1
b) edit keygroup 1 to add these 4 keys back in.
c) edit keygroup 1 , change the last offset from 18 to 20

save to a NEW setup :wink:

personally, Id say this is ‘good practice’, so you can get a bit of confidence tailoring to your own need, as its straightforward as the base setup is very simple

1 Like

Thank you so much Mark!

I’ve crashed hard after the last couple of days of studio tinkering, forcing me back to bedrest, but your instructions are clear as day. The last task I did with the studio PC was install LoopBE, so everything should be ready for these finals steps.

You’ve helped lift so much techno-anxiety from my shoulders. I’ve tipped you a few coffees as thanks. :slight_smile:

Cheers all!

1 Like

I couldn’t wait, have it installed, and am playing a physically modelled guitar using the Tau through my rig. :slight_smile:

Workbench is slowly starting to make sense to me, especially when I realised I had to click a tool at the top to see the various options. I’m a total newbie with it all.

I’ve managed to get the intervals to 5ths, and reversed that layout. It’s working!

THANK YOU!

3 Likes

cool, glad you got it working …

I saw your youtube video - looks like you’re set for fun.

you mentioned pitch bend was reversed, I had a check and it seemed fine to me…
expectation thing?
so the ‘roll’ is going in the direction of the scale… so ‘rolling’ down will lead to an increase in pitch.
e.g. imagine chromatic scale, and you set pitch bend set to 1 semi, then roll down, will lead to the same pitch as the note below it, which is one semitone higher.

though, I can see why you might think roll up = pitch bend up etc.

theoretically you could change this, if you wanted…
there is an object called ‘range’, that allows you to manipulate signals e.g. invert them,
so basically you could do this on the roll signal.

there is wire from
keygroup → keygroup outputs → roll output
to
scaler → roll input (scaler is responsible for turning a key into a note frequency, including bend)

so keygroup:output 1: roll output → scaler: roll input

disconnect this, and insert a ranger in between , so

keygroup:output 1: roll output → ranger: input , ranger : output-> scaler: roll input

then on ranger set max to -1, and min to 1, which inverts the signal -1 → 1, to 1 → -1

offhand I cannot remember what the other settings would have to be, likely absolute off is the only other change?

I guess, another alternative, would be to do this in midi, possibly within ableton?
output pb = 8192 - input pb, would invert it, in the midi realm.

all that said, Id not really recommend this…
as, you’ll get muscle memory on the Tau that will not translate to any other setup without altering it.

its funny, not heard it as a request before, surprising, given how configureable scaler and midi converter are - I guess, players got used to it?

1 Like

Thanks for your detailed reply Mark

There’s a chance I could have broken something, but the pitch bend is the opposite to how it should be.

I’m pretty certain the issue might be how I hacked the scaler in a round about way - by changing scale input to [24,23,22,21,20,19,18,17,16,15,14,13,12,11,10,9,8,7,6,5,4,3,2,1,0,-1,-2,-3,-4,-5,-6,-7,-8,-9,-10,-11,-12,-13,-14,-15,-16,-17,-18,-19,-20,-21,-22,-23,-24]

I realise that I probably should have remapped using the musical mapping tool in keygroup1, but I only discovered how that worked after I did the above, so I’m probably going to go back and do everything properly from scratch.

BUT I’m starting to really understand what I’m doing thanks to you.

One thing I was trying to do before my brain imploded the other night was working out the syntax to have the root note and 5th’s LEDs illuminated across the scale. I’m guessing it’s in illuminator 1 and ‘musical light mapping’.

Thanks again!

could be… indeed, the scaler is designed to be a musical scale, not how you want to map keys :slight_smile: - thats done, as you found in the keygroup.

I know EigenD feels complex at times, but its actually a really well thought out piece of software which is rooted in real musical requirements…
its just as musicians we all like things different, so the complexity comes from allowing for all these different things.

we joke often here, one issue with the Eigenharp is , as a player you cannot pick up another players eigenharp and play it, because it’ll just be setup so differently from your own :slight_smile:

yeah, theres a couple of different ways…

scaler - so if you connect up the keygroup lights input to the scaler output, that gives you the octave light… so if you dont want that you have to remove that wire.

illuminator - is arbitrary mapping, basically just light things up as you want.
musical mapping or physical is really just 2 different ways of referring to the keys - physical is just simple row/column, musical is used to allow for isomorphism.

I also created ‘scale illuminator’, this is used to light up scales (most useful on chromatic layout) , useful for learning / discovering new scales. - also makes the eigenharp look like a christmas tree :laughing:

I personally, now just use illuminator with static lights which don’t really mean anything, but just let me see quickly whereabouts on the surface I am - important on the alpha as its alot of keys in a big rectangle :slight_smile:

sometimes, I just switch to octave lights, less is more a lot of the time…

1 Like

I tried setting up a few if the keys using the musical mapping tool, and the pitch bend still goes the in the wrong direction. What I need to do is somehow add -24 to ‘key bend range input’ in scaler 1, but it only allows positive numbers. Is it possible to edit the XML to see if a minus number would work?

Thanks for your tips re: illuminations. I think just a simple octave illuminated anchor point would be enough, so I’ll locate the right ports and connect them up.

what do you mean by “pitch bend still goes the in the wrong direction.” ?

i tested the setup I sent you on my tau, and it worked correctly (as I detailed above)

This video should hopefully explain about what I mean about the pitch bend. I maxed the pitch bend to 72 to demonstrate

I really struggle processing chunks of text when the fatigue is bad, so there’s a chance I’ve missed one of your steps.

[edit] Apologies for the weird effect on the voice. I’ve uploaded my current preset here Unique Download Link | WeTransfer

ok, Ive had a test and also a look at the code…

tldr;, this is “hardcoded” to bend in the the direction of roll… so +1 roll = pitch up.

I assumed (incorrectly) it would use the musical layout, using the course.
but it doesn’t thats possibly because there is nothing to say the course is contiguous.
nor is there anything to say the course runs vertically… its deliberately ‘flexible’.

and it cannot use the scale, simply because if you had a major scale selected, you usually still want a semi tone bend (it doesn’t vary between C->D and E->D)

so I can kind of see the logic…

BUT
EigenD is modular… thats where it gets very powerful, you can manipulate signals in the same way you can CV in eurorack etc :slight_smile:

so, as I said previously, we can invert the signal using ranger.

currently you can see the wiring here for key bend

But I can disconnect this and rewire it via ranger (an object to manipulate signals)
here I invert the signal (note min/max are flipped)

voila, we have an inverted bend.

here is the setup for your amusement…

tauinvbend.zip (39.4 KB)

note: I only did on main keyboard, I’ll leave it to you to do the percussion keys :wink:


HOWEVER, as I said, previously… Im not sure Id 100% recommend this.
the point is, its not how other setups behave… the ‘eigenharp’ way (right or wrong) is the other way.

one thing Ive noticed, over the years, is whilst the Eigenharp / EigenD is really flexible, and for sure ‘make it your own’ - often new players try to twist it to preconceived ideas, and whilst it CAN be done, you quickly get into the weeds of EigenD/Workbench, which as you’ve seen can be a bit daunting…
we’ve seen people walk away, as its too complicated, rather than just enjoy it as an out of the box experience (with factory setups), at least initially.

again, just a cautionary tale, Im not saying don’t do it… hell, my EigenD setup was built from ‘scratch’, but I did that after a while, and I still go back to the factory setups occasionally :slight_smile:

5 Likes

Thank you so much for all of this Mark!

I’m forced to use the Tau in this way because of logistics. I lost a lot of strength and dexterity with my left hand and fingers, so the playing surface has to be where the right hand naturally hovers, and the space is limited, and I need the course of the Tau to run in the same direction as the keys and Linnstrument.

Thank you so much for playing around with the setup for me! Your explanation above completely blew my brain into submission, but I know that it contains the keys for me to understand it all.

Cheers :slight_smile:

1 Like