My Eigenharp Pico got fried

Hey all,

Wanted to fire up my Pico and do some testing and practice in Gig Performer but opening EigenD did not start the familiar LEDs on my Pico

Turns out - the bottom part (where the cable is coming in) was getting very hot and the computer kept complaining about the USB power usage.

After opening the Pico (not an easy task) I identified one IC that’s hot and fried. Can’t make up the markings on it any more because it bulged a little so I’m have no clue what the chip is.

I wanted to upgrade to a Tau for the longest time - now may be the time, but it’s unclear if eigenharp people will make more devices. Does anyone have news?

Does anyone have a schema of the Pico? I doubt it, but identifying that small IC could allow me to at least repair the Pico. @thetechnobear - maybe you have some kind of inner electronics schema?

Anyone has a spare, broken Pico? I could use it to pull out and replace the burnt parts…

Thanks guys.

Hi @djogon, ohhh not good news on your Pico;

best is to contact (send email? Or call?) to Eigenlabs

official support contact John Lambert via customerservices@eigenlabs.com

I think they still have Pico in store, maybe Tau also?

I have 3 working Pico, I can open one up an take some photos :wink: just let me know.

Thanks @keymanpal - I contacted Eigenlabs already, but if you could identify this chip that would be awesome!

The issues is - you’ll have to open your Pico to take a “peek” :slight_smile:

And in my recent experience it isn’t easy so I’m not going to take it against you if you give up :slight_smile:

If you decide to do it - the chip is at the very bottom where the usb cable comes into the Pico. There are few chips, the one burnt is the one in the bottom right if you look at the board with the bottom down.

I can send you a picture circling the chip if you want or you just snap a HQ photo of that area and I’ll see what the chip is.

Thanks Antonio! Hard to live without an Eigenharp around. Used to just grab it and test things in GP quickly…
Now I have to use a clumsy keyboard all the time :slight_smile:

1 Like

sorry, I’ve no technical details (other than the open source code of EigenD)

unfortunately, I think your best bet is Eigenlabs (as @keymanpal suggested)

the main issue is, Eigenlabs have advised against opening up Eigenharps.
the reason is, after opening they will need re-calibrating - this has to be done on a hardware jig that Eigenlabs have in their workshop - so be cannot be maintained without this jig (and associated software).

we have no idea how much the calibration will be thrown out, by opening a pico (or any eigenharp), and I don’t know of anyone that has been ‘brave enough’ to try, so we really don’t know the consequences.

all really know is the keys are very sensitive and Eigenlabs have said re-calibration is necessary when they harps are opened/maintained.


as an aside, just to ‘get the information out there’
there are calibration routines in the source code for the pico
e.g. see https://github.com/TheTechnobear/EigenD/tree/2.2/lib_pico

you can see preadcal, pwritecal… so you might be able to read the current calibration, and ‘adapt’ it if you had issues… you can see roughly what’s its doing using the source code.

however, I should point out as users we have never tried these, so we do not know pwritecal works correctly, they are not ‘releases’, so could even be ‘out of date’ .
thats problematic, since overwriting calibration data with invalid values with definitely render your pico unusable.

note:
the alpha and tau are different again… as far as i can tell from the source code, you cannot read the calibration data at all… the firmware only supports writing calibration data (seems similar format to pico) and clearing it.
this means you really would not want to do this ever, as you have absolute no ‘base line’ to compare against.

again, in all fairness, to Eigenlabs - these tools/firmware were designed to be used an automated hardware jig, rather than any kind of user calibration system.

note 3: format of calibration (as far as i can tell, with a quick look)
for each key there is a minimum and maximum value, then there 30 values… the issue is we have no idea what these values represent… perhaps something like 10 values per (3) axis?
but might not be the case at all, since we don’t know how the keys actually determined x/y/z, and given pictures of the key internals we have seen, I do not think its as simple as independent x/y/z sensors… then again, we also don’t know where in the process these calibration values are used :frowning:
(bare in mind all this ‘translation’ is done in the eigenharps firmware which we don’t have the source code for)

2 Likes

Thanks for the detailed info Mark…

I’ve opened mine carefully and to be honest not sure whats to calibrate… :slight_smile:

If this was so sensitive it would have been “decalibrated” after almost a decade of use on stage, thrown in a bag, dropped …

The keys seems solid pieces. Maybe if I was to aggressively clean or push on the exposed keys somehow… not sure.

If they recommend it though then it’s most likely that I’m missing something. They’d know their device a bit better than me :slight_smile:

I’ll try to raise someone at Eigenlabs and see.

(bare in mind all this ‘translation’ is done in the eigenharps firmware which we don’t have the source code for)

Yes - I’m aware of this and we’re all really amazed of what you have been able to accomplish without access to this so far….

Any hint that they might open this up. Maybe not for everyone but to you explicitly as it seems to me without you many people would not be able to use their ,harps at all. I know I wouldn’t.

1 Like

yeah, Ive no idea what the calibration is for either…
you’d think mainly it would cover ‘manufacturing’ tolerances within the key mechanism, but that would be fairly ‘fixed’ after construction.

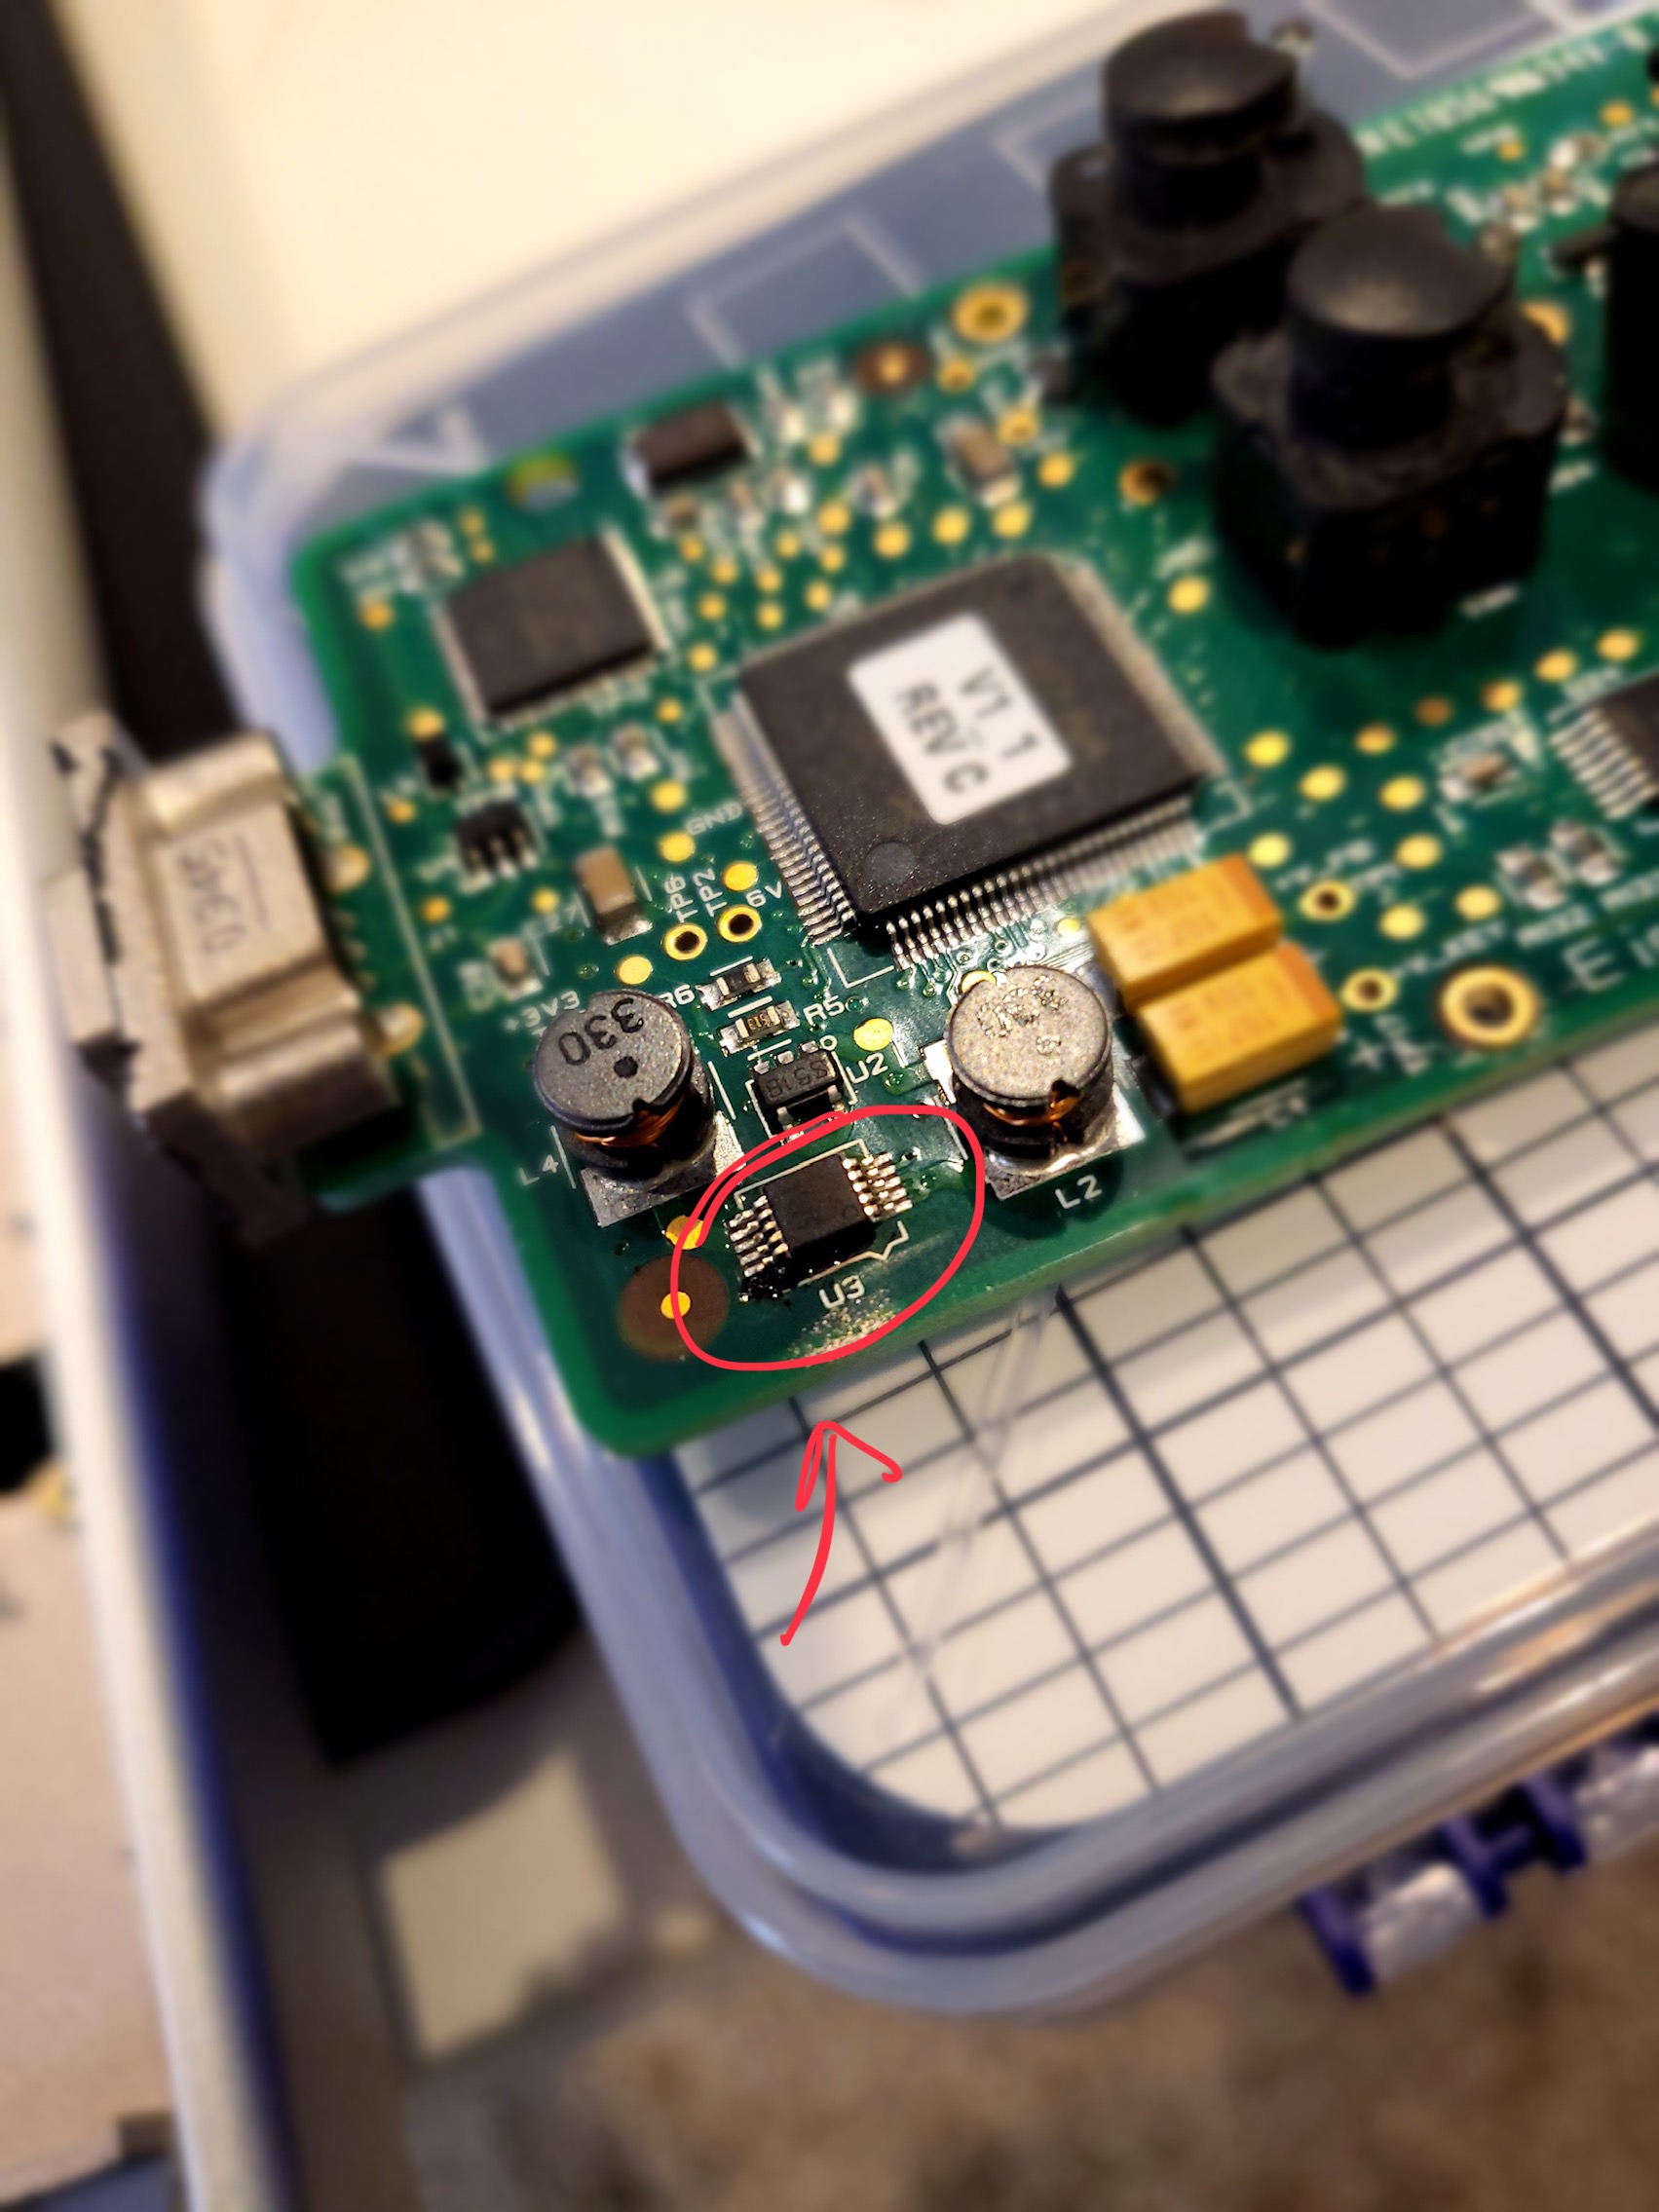
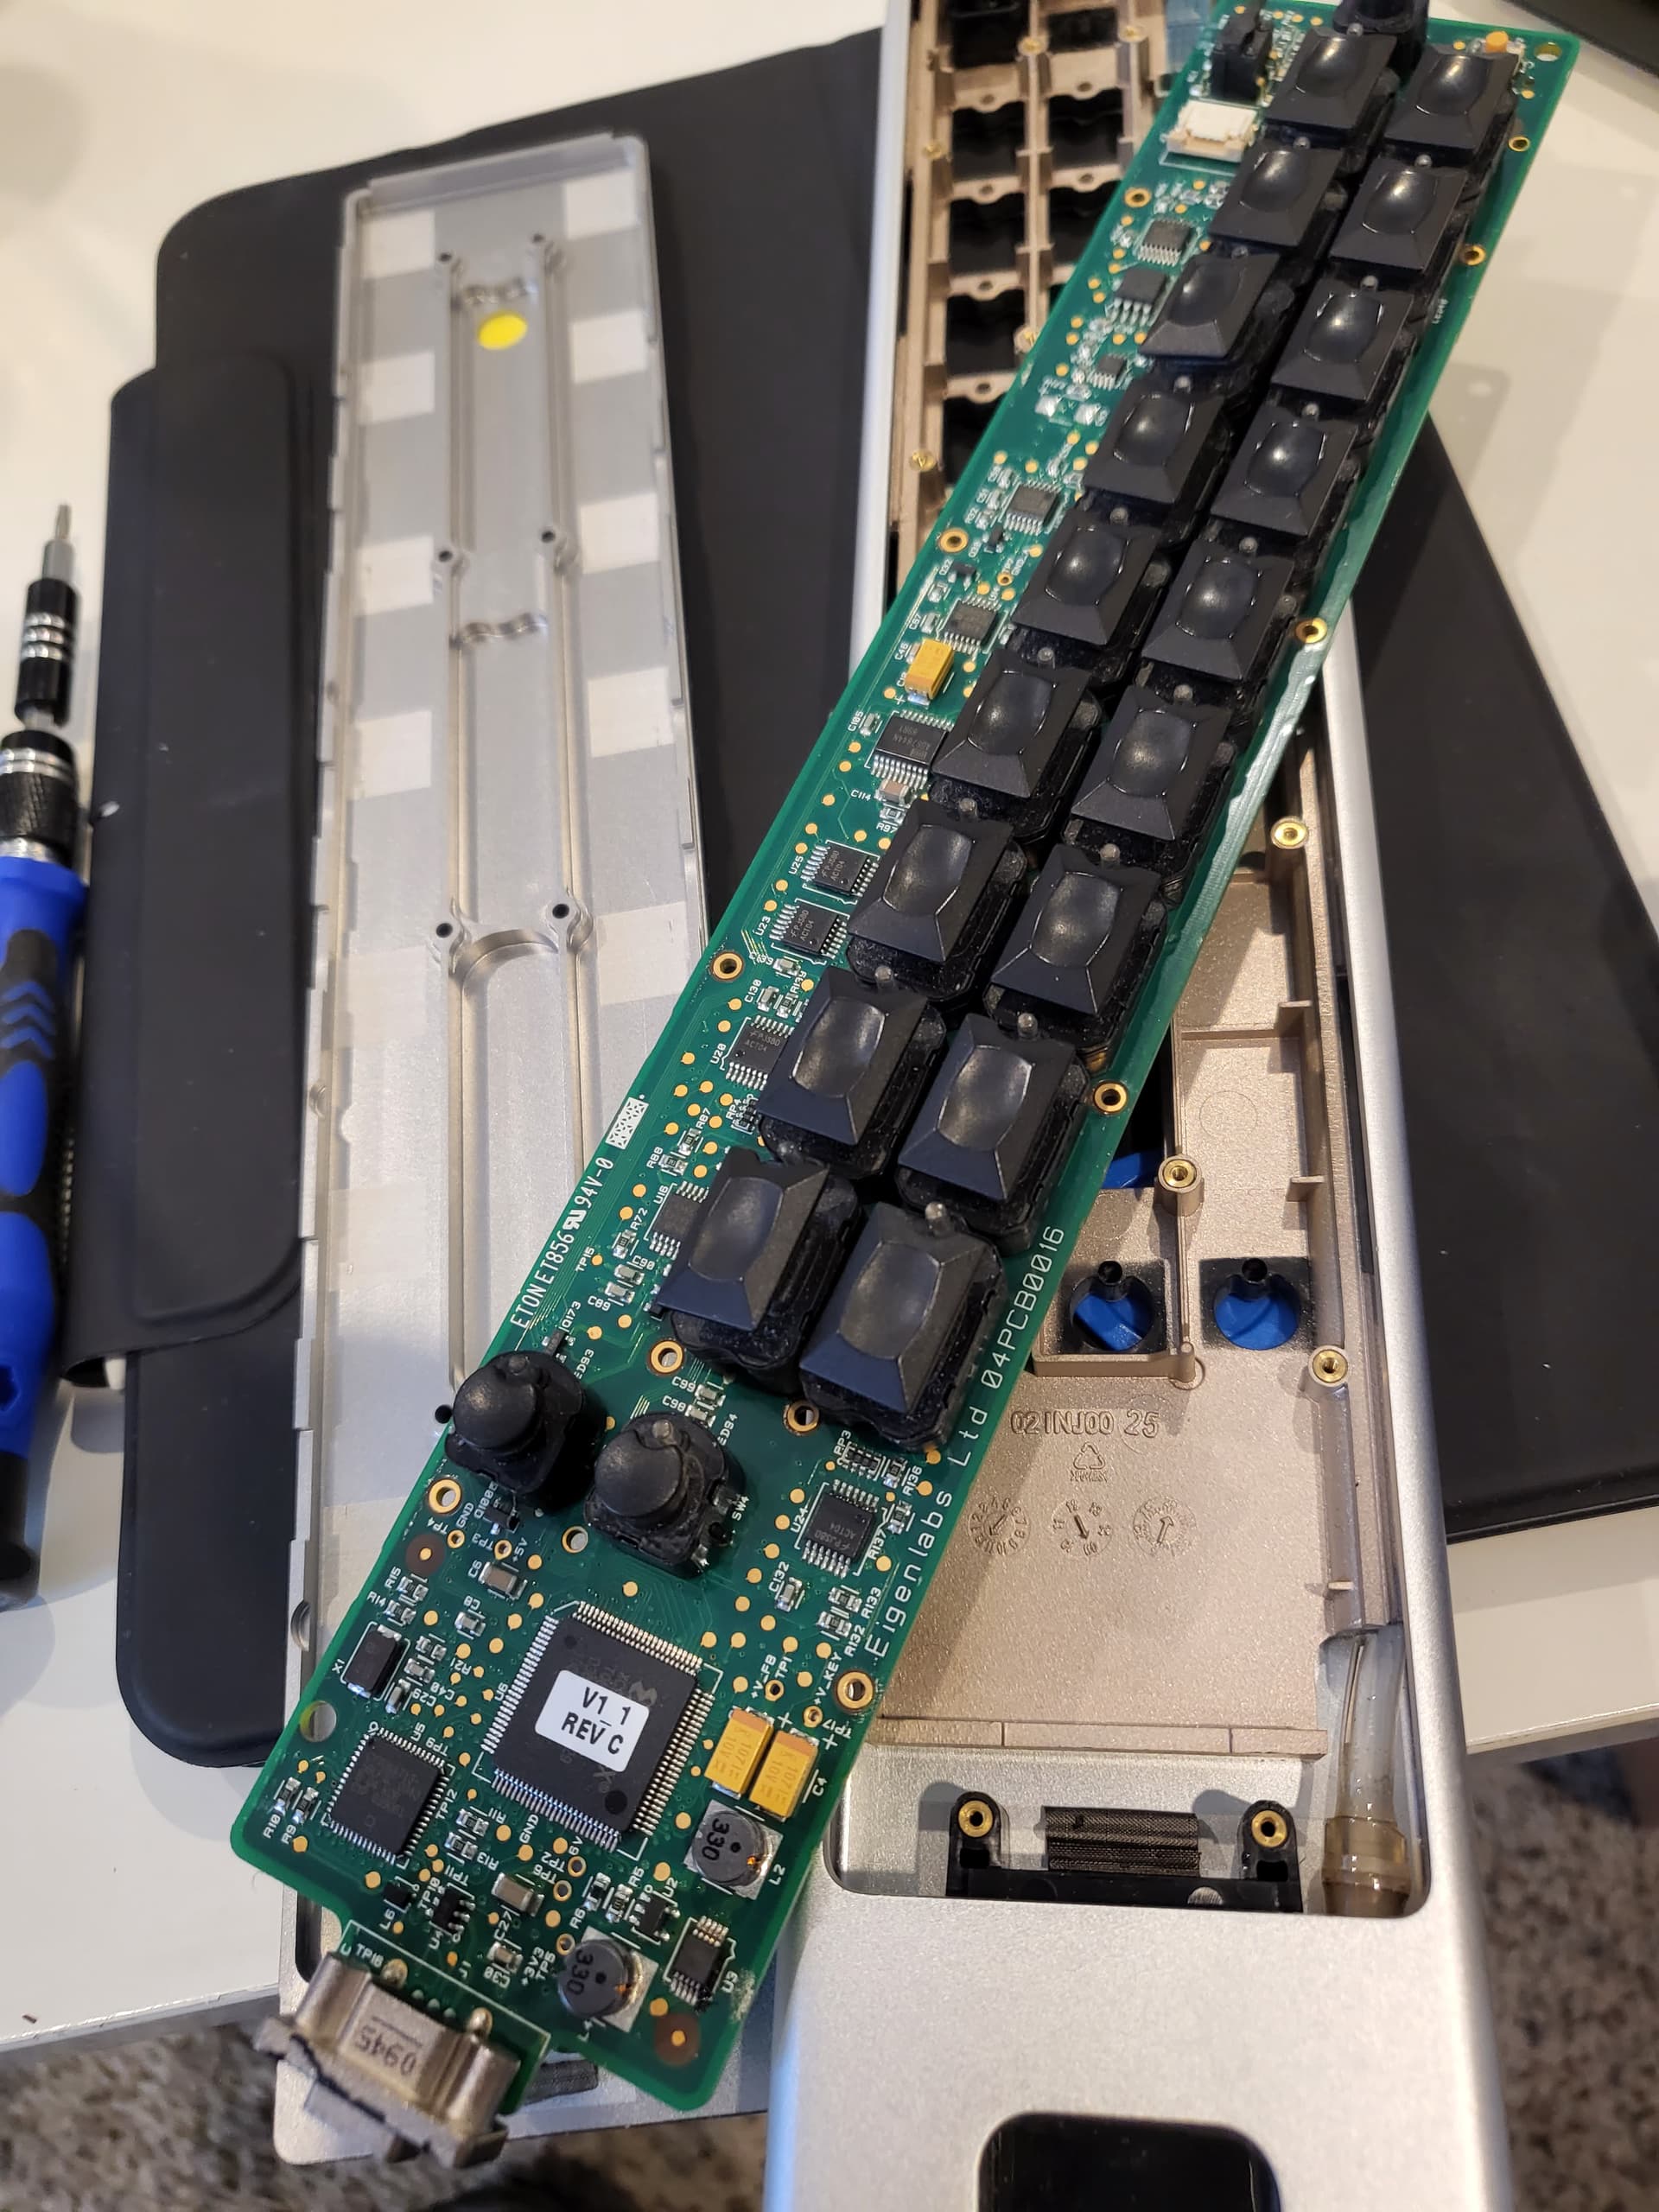
that said, Ive not see the key mechanism, but I now others here have… as they showed at the EigenLabs ‘dev con’ one year (before my time unfortunately) … there they were shown in pieces, so perhaps they are not one solid piece… but again, would taking apart (carefully) really alter their characteristics?

my only thought is perhaps something changes vert slightly as they are mounted/supported in the case, which can make tiny changes? but its all pure speculation.

so I don’t really know,
it’s not uncommon for manufactures to try to dissuade users to not take apart devices…
partly because some can be a bit ‘clumsy’ or just not take necessary precautions, and unfortunately the some will then expect the manufacturer to fix their mistakes.
so perhaps this is the case here.

however, in this particular case, EigenLabs were very explicit about the issue of calibration, and the necessity of using a the hardware jig to recalibrate.

I guess what we really don’t know is … does dis-assembly 100% mean mis-calibration, or does it cause possible mis-calibration… and if so what preventative measures can be taken.

for sure, this is a concern long term.
whilst John/EigenLabs have been really great at continuing to service Eigenharps, that cannot happen forever … and no-one else has the jig (*) necessary to do this calibration :frowning:


(*) apparently the jig is pretty complex, from what I understand, basically holds Eigenharp in places and presses keys very precisely, while communicating with the software of the Eigenharp to get its readings.
so, knowing what force you apply, and what it reads would lead to calibration data.
given the sensitivity of the eigenharp keys, these exertions of pressure must be exceedingly precise.

so unfortunately, very much a custom bit of gear that would be very hard to reproduce even if we had the specifications and process (**) … which we do not :frowning:

(**) I should say, as far as I know, no-one has ever approached John/Eigenlabs about this, so there is a possibility they’d be happy to share details, find a solution. but honestly, thats only really viable for another instrument manufacturer … rather than a musicians/developer.

1 Like

I’ll try to snap some pics while my Pico I still open and if I do find out the chip I need to replace and fix it I’ll report back to say if calibration is needed or not. If something is off with the keys I’ll know. I’ve been using this for a long time…

On the other hand - John may have thought about taking apart the actual keys themselves. That would make sense as it could move the precise mechanism in them, but I haven’t taken that apart. The plastic on the top is just a piece of plastic…

I’ll keep you posted. @keymanpal will hopefully be able to help.

1 Like

I doubt that… as far as Ive seen in the keys breakdown - theres nothing serviceable within the keys.
I think if a key had a fault, Eigenlabs would simply replace that key, they are the same across all models (*)

anyway, definitely will be interesting to hear how you get on if you can get it to work again.

my main concern, is I don’t think anyone should open a working pico. I personally do think its worth the risk… as if calibration is required, we really don’t have a known way back from this.
(and its not something I can test, since Id not want to risk ‘bricking’ my pico)

as you mentioned, the best way would be to get another broken pico (with a different fault!).
but, of course, I recognise, thats going to require a lot of ‘luck’ given scarcity of eigenharps.


(*) ok, there are two variations, normal size, and percussion keys … though both work identically, as far as I know.

1 Like

If this is a big concern ill ask @keymanpal not to open his Pico.
No point in him risking his Pico …

@keymanpal decided to open his Pico after all !

In the mean time here are some pics for anyone interested in what their Pico looks like inside.

6 Likes

cool, shots… could you possibly get some close up shots along the entire board.
(I assume its single sided?)

it’d be interesting to see what chips are generally on the pcb - see which ones we can make out their function.
also be interesting to see under that label… as that looks like the main cpu/fpga?
(I wonder what the small one is to the lower/left)
also at the top, below what I assume is the flow sensor, is that a connector? (for debugging board?)

also have you checked the voltage points? particularly the 3.3v one?
perhaps something like the regulator is over volting , and so why things are getting hot?

(I guess one question is… if U3 has blown… why? cause or effect?)

1 Like

Right. No point replacing it unless I figure out why it blew in the first place.

With brave @keymanpal help We found out it is an ic marked with

BATI
BBQ

I can’t find a chip wit that name. Does anyone have a clue what this is?

1 Like

It seems that the Mac i used is to be boamed for this
It fried one of my extermal disk drives.

Can’t risk plugging anything into it unless I get a chance to bring it to the Apple store

Just heads up - make sure you check this before plugging your valuable devices in

This is the last Mac before the M1 came out I think.

ohh not good; something is not right there.

So, all USB-C…
It does frighten me, voltage wise, what comes out of a Mac USB-C.

Yes. Just heads up for everyone. Seems I’m not the only one

1 Like

Ouch, that’s not good … sorry to hear !

Update: I’ll have a direct support call with Apple today regarding this and will let you all know the result

Seems they’re aware of this issue with this particular model. This is a 2017 Intel MacBook Pro

Told me to stop using or charging it until we talk so it seems serious.

Side note: Based on this - seems that part of power distribution is fried but impossible to fix because I still don’t know what the chip in question is. Maybe a seasoned hardware expert could just identify it if it’s some kind of common power distribution

If anyone knows one and shares the pictures with him - that may help me so… if you do have someone like that please ask them and let me know

Cheers

1 Like

autchhh, I have one - served me well; battery is gone by now; it has been my main machine, now transitioning to M1 Pro MBP

I have someone I trust all gear but… he is on vacation, have to wait a bit before I dare to “upset” him :wink:

1 Like

I hope this isn’t too late to be of use, but I did open up my Tau trying to get it to work again, which I wrote about here:

The first point is, because of this calibration issue, any opening of any Eigenharp is a great opportunity to publicly document as much of the internals as possible, so kudos for those pictures! With enough information, some problems might be able to be solved without having to open a “virgin” instrument. If yours is still open, I second Mark’s request for more pictures :drooling_face:

Second, when I did finally get the Tau working again, I did not notice any calibration problems and the keys seemed to respond as before. I was very careful to avoid disturbing anything relating to the keys but if you read the above thread, some was inevitable. There could have been a small change that was too small for me to notice though. Based on the Tau board, I can see how differing pressures on it (e.g. slightly different torque on screws while reassembling) could cause small deflection differences on individual unloaded keys that could be compensated for.

I’ll end with a question, have you or anyone else made contact with John lately? If there was one message in a bottle I could get across, it would be to please open as much of the remaining engineering details as possible (protocols, instrument and basestation firmware, etc) so that we diehard fans can get the most mileage out of them.

The next best thing would be to be able to get them repaired and/or recalibrated but I’m not even sure if anyone has been able to do that recently.

-Josh

1 Like